Drawing
New in version 0.3.0.
The wand.drawing module provides some basic drawing functions.
wand.drawing.Drawing object buffers instructions for drawing
shapes into images, and then it can draw these shapes into zero or more
images.
It’s also callable and takes an Image object:
from wand.drawing import Drawing
from wand.image import Image

with Drawing() as draw:
    # does something with ``draw`` object,
    # and then...
    with Image(filename='wandtests/assets/beach.jpg') as image:
        draw(image)
Arc
New in version 0.4.0.
Arcs can be drawn by using arc() method. You’ll
need to define three pairs of (x, y) coordinates. First & second pair of
coordinates will be the minimum bounding rectangle, and the last pair define
the starting & ending degree.
An example:
from wand.image import Image
from wand.drawing import Drawing
from wand.color import Color

with Drawing() as draw:
    draw.stroke_color = Color('black')
    draw.stroke_width = 2
    draw.fill_color = Color('white')
    draw.arc(( 25, 25),  # Stating point
             ( 75, 75),  # Ending point
             (135,-45))  # From bottom left around to top right
    with Image(width=100,
               height=100,
               background=Color('lightblue')) as img:
        draw.draw(img)
        img.save(filename='draw-arc.gif')

Bezier
New in version 0.4.0.
You can draw bezier curves using bezier() method.
This method requires at least four points to determine a bezier curve. Given
as a list of (x, y) coordinates. The first & last pair of coordinates are
treated as start & end, and the second & third pair of coordinates act as
controls.
For example:
from wand.image import Image
from wand.drawing import Drawing
from wand.color import Color

with Drawing() as draw:
    draw.stroke_color = Color('black')
    draw.stroke_width = 2
    draw.fill_color = Color('white')
    points = [(10,50),  # Start point
              (50,10),  # First control
              (50,90),  # Second control
              (90,50)]  # End point
    draw.bezier(points)
    with Image(width=100,
               height=100,
               background=Color('lightblue')) as image:
        draw(image)
Control width & color of curve with the drawing properties:
Circle
New in version 0.4.0.
You can draw circles using circle() method.
Circles are drawn by defining two pairs of (x, y) coordinates. First coordinate
for the center “origin” point, and a second pair for the outer
perimeter. For example, the following code draws a circle in the middle of
the image:
from wand.image import Image
from wand.drawing import Drawing
from wand.color import Color

with Drawing() as draw:
    draw.stroke_color = Color('black')
    draw.stroke_width = 2
    draw.fill_color = Color('white')
    draw.circle((50, 50), # Center point
                (25, 25)) # Perimeter point
    with Image(width=100, height=100, background=Color('lightblue')) as image:
        draw(image)
Color & Matte
New in version 0.4.0.
You can draw with colors directly on the coordinate system of an image. Define
which color to set by setting fill_color.
The behavior of color() is controlled by setting
one of PAINT_METHOD_TYPES paint methods.
'point'alters a single pixel.'replace'swaps on color for another. Threshold is influenced byfuzz.'floodfill'fills area of a color influenced byfuzz.'filltoborder'fills area of a color until border defined byborder_color.'reset'replaces the whole image to a single color.
Example fill all to green boarder:
from wand.drawing import Drawing
from wand.color import Color

with Drawing() as draw:
    draw.border_color = Color('green')
    draw.fill_color = Color('blue')
    draw.color(15, 25, 'filltoborder')
The matte() method is identical to
the color()
method above, but alters the alpha channel of the color area selected. Colors
can be manipulated, but not replaced.
with Drawing() as draw:
    draw.fill_color = None  # or Color('none')
    draw.matte(15, 25, 'floodfill')
Composite
New in version 0.4.0.
Similar to composite_channel(), this
composite() method will render a given image on
top of the drawing subject image following the
COMPOSITE_OPERATORS options. An compositing image must be
given with a destination top, left, width, and height values.
from wand.image import Image, COMPOSITE_OPERATORS
from wand.drawing import Drawing
from wand.display import display

wizard = Image(filename='wizard:')
rose = Image(filename='rose:')

for o in COMPOSITE_OPERATORS:
  w = wizard.clone()
  r = rose.clone()
  with Drawing() as draw:
    draw.composite(operator=o, left=175, top=250,
                   width=r.width, height=r.height, image=r)
    draw(w)
    display(w)
Ellipse
New in version 0.4.0.
Ellipse can be drawn by using the ellipse() method.
Like drawing circles, the ellipse requires a origin point, however, a pair
of (x, y) radius are used in relationship to the origin coordinate. By
default a complete “closed” ellipse is drawn. To draw a partial ellipse, provide
a pair of starting & ending degrees as the third parameter.
An example of a full ellipse:
from wand.image import Image
from wand.drawing import Drawing
from wand.color import Color

with Drawing() as draw:
    draw.stroke_color = Color('black')
    draw.stroke_width = 2
    draw.fill_color = Color('white')
    draw.ellipse((50, 50), # Origin (center) point
                 (40, 20)) # 80px wide, and 40px tall
    with Image(width=100, height=100, background=Color('lightblue')) as image:
        draw(image)
Same example as above, but with a half-partial ellipse defined by the third parameter:
draw.ellipse((50, 50), # Origin (center) point
             (40, 20), # 80px wide, and 40px tall
             (90,-90)) # Draw half of ellipse from bottom to top
Lines
You can draw lines using line() method.
It simply takes two (x, y) coordinates for start and end of a line.
For example, the following code draws a diagonal line into the image:
draw.line((0, 0), image.size)
draw(image)
Or you can turn this diagonal line upside down:
draw.line((0, image.height), (image.width, 0))
draw(image)
The line color is determined by fill_color
property, and you can change this of course. The following code draws
a red diagonal line into the image:
from wand.color import Color

with Color('red') as color:
    draw.fill_color = color
    draw.line((0, 0), image.size)
    draw(image)
Paths
New in version 0.4.0.
Paths can be drawn by using any collection of path functions between
path_start() and
path_finish() methods. The available path functions
are:
path_close()draws a path from last point to first.path_curve()draws a cubic bezier curve.path_curve_to_quadratic_bezier()draws a quadratic bezier curve.path_elliptic_arc()draws an elliptical arc.path_horizontal_line()draws a horizontal line.path_line()draws a line path.path_move()adjust current point without drawing.path_vertical_line()draws a vertical line.
Each path method expects a destination point, and will draw from the current
point to the new point. The destination point will become the new current point
for the next applied path method. Destination points are given in the
form of (x, y) coordinates to the to parameter, and can by relative
or absolute to the current point by setting the relative flag. The
path_curve() and
path_curve_to_quadratic_bezier() expect
additional control points, and can complement previous drawn curves by
setting a smooth flag. When the smooth flag is set to True the first
control point is assumed to be the reflection of the last defined control point.
For example:
from wand.image import Image
from wand.drawing import Drawing
from wand.color import Color

with Drawing() as draw:
    draw.stroke_width = 2
    draw.stroke_color = Color('black')
    draw.fill_color = Color('white')
    draw.path_start()
    # Start middle-left
    draw.path_move(to=(10, 50))
    # Curve accross top-left to center
    draw.path_curve(to=(40, 0),
                    controls=[(10, -40), (30,-40)],
                    relative=True)
    # Continue curve accross bottom-right
    draw.path_curve(to=(40, 0),
                    controls=(30, 40),
                    smooth=True,
                    relative=True)
    # Line to top-right
    draw.path_vertical_line(10)
    # Diagonal line to bottom-left
    draw.path_line(to=(10, 90))
    # Close first & last points
    draw.path_close()
    draw.path_finish()
    with Image(width=100, height=100, background=Color('lightblue')) as image:
        draw(image)
Point
New in version 0.4.0.
You can draw points by using point() method.
It simply takes two x, y arguments for the point coordinate.
The following example will draw points following a math function across a given
image:
from wand.image import Image
from wand.drawing import Drawing
from wand.color import Color
import math

with Drawing() as draw:
    for x in xrange(0, 100):
        y = math.tan(x) * 4
        draw.point(x, y + 50)
    with Image(width=100, height=100, background=Color('lightblue')) as image:
        draw(image)
Color of the point can be defined by setting the following property
Polygon
New in version 0.4.0.
Complex shapes can be created with the polygon()
method. You can draw a polygon by given this method a list of points. Stroke
line will automatically close between first & last point.
For example, the following code will draw a triangle into the image:
from wand.image import Image
from wand.drawing import Drawing
from wand.color import Color

with Drawing() as draw:
    draw.stroke_width = 2
    draw.stroke_color = Color('black')
    draw.fill_color = Color('white')
    points = [(25, 25), (75, 50), (25, 75)]
    draw.polygon(points)
    with Image(width=100, height=100, background=Color('lightblue')) as image:
        draw(image)

Control the fill & stroke with the following properties:
Polyline
New in version 0.4.0.
Identical to polygon(), except
polyline() will not close the stroke line
between the first & last point.
For example, the following code will draw a two line path on the image:
from wand.image import Image
from wand.drawing import Drawing
from wand.color import Color

with Drawing() as draw:
    draw.stroke_width = 2
    draw.stroke_color = Color('black')
    draw.fill_color = Color('white')
    points = [(25, 25), (75, 50), (25, 75)]
    draw.polyline(points)
    with Image(width=100, height=100, background=Color('lightblue')) as image:
        draw(image)

Control the fill & stroke with the following properties:
Push & Pop
New in version 0.4.0.
When working with complex vector graphics, you can use ImageMagick’s internal
graphic-context stack to manage different styles & operations. The methods
push(), push_clip_path(),
push_defs(), and push_pattern()
are used to mark the beginning of a sub-routine. The clip path & pattern methods
take a name based identifier argument, and can be referenced at a latter point
with clip_path, or
set_fill_pattern_url() /
set_stroke_pattern_url()
respectively. With stack management, pop() is used
to mark the end of a sub-routine, and return the graphical context to its
pervious state before push() was invoked.
Methods pop_clip_path(),
pop_defs(), and pop_pattern()
exist to match there pop counterparts.
from wand.color import Color
from wand.image import Image
from wand.drawing import Drawing
from wand.compat import nested
from math import cos, pi, sin

with nested(Color('lightblue'),
            Color('transparent'),
            Drawing()) as (bg, fg, draw):
    draw.stroke_width = 3
    draw.fill_color = fg
    for degree in range(0, 360, 15):
        draw.push()  # Grow stack
        draw.stroke_color = Color('hsl({0}%, 100%, 50%)'.format(degree * 100 / 360))
        t = degree / 180.0 * pi
        x = 35 * cos(t) + 50
        y = 35 * sin(t) + 50
        draw.line((50, 50), (x, y))
        draw.pop()  # Restore stack
    with Image(width=100, height=100, background=Color('lightblue')) as img:
        draw(img)
Rectangles
New in version 0.3.6.
Changed in version 0.4.0.
If you want to draw rectangles use rectangle()
method. It takes left/top coordinate, and right/bottom
coordinate, or width and height. For example, the following code
draws a square on the image:
draw.rectangle(left=10, top=10, right=40, bottom=40)
draw(image)
Or using width and height instead of right and bottom:
draw.rectangle(left=10, top=10, width=30, height=30)
draw(image)
Support for rounded corners was added in version 0.4.0. The radius argument
sets corner rounding.
draw.rectangle(left=10, top=10, width=30, height=30, radius=5)
draw(image)
Both horizontal & vertical can be set independently with
xradius & yradius respectively.
draw.rectangle(left=10, top=10, width=30, height=30, xradius=5, yradius=3)
draw(image)
Note that the stoke and the fill are determined by the following properties:
Texts
Drawing object can write texts as well using its
text() method. It takes x and y
coordinates to be drawn and a string to write:
draw.font = 'wandtests/assets/League_Gothic.otf'
draw.font_size = 40
draw.text(image.width / 2, image.height / 2, 'Hello, world!')
draw(image)
As the above code shows you can adjust several settings before writing texts:
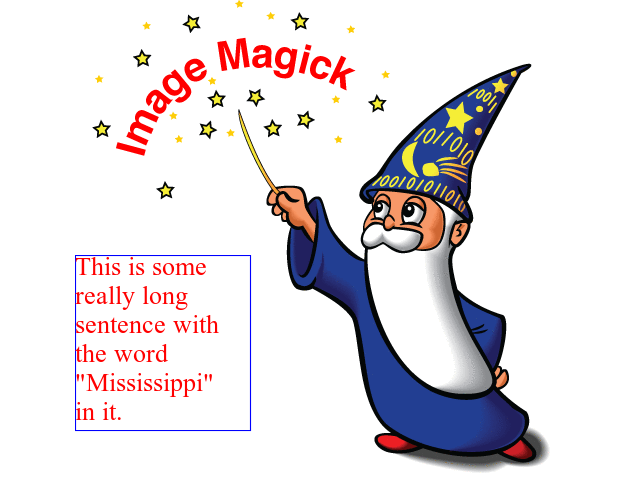
Word Wrapping
The Drawing class, by nature, doesn’t implement any
form of word-wrapping, and users of the wand library would be responsible
for implementing this behavior unique to their business requirements.
ImageMagick’s caption: coder does offer a word-wrapping solution with
Image.caption() method, but Python’s textwrap is
a little more sophisticated.
from textwrap import wrap
from wand.color import Color
from wand.drawing import Drawing
from wand.image import Image


def draw_roi(contxt, roi_width, roi_height):
    """Let's draw a blue box so we can identify what
    our region of intrest is."""
    ctx.push()
    ctx.stroke_color = Color('BLUE')
    ctx.fill_color = Color('TRANSPARENT')
    ctx.rectangle(left=75, top=255, width=roi_width, height=roi_height)
    ctx.pop()


def word_wrap(image, ctx, text, roi_width, roi_height):
    """Break long text to multiple lines, and reduce point size
    until all text fits within a bounding box."""
    mutable_message = text
    iteration_attempts = 100

    def eval_metrics(txt):
        """Quick helper function to calculate width/height of text."""
        metrics = ctx.get_font_metrics(image, txt, True)
        return (metrics.text_width, metrics.text_height)

    while ctx.font_size > 0 and iteration_attempts:
        iteration_attempts -= 1
        width, height = eval_metrics(mutable_message)
        if height > roi_height:
            ctx.font_size -= 0.75  # Reduce pointsize
            mutable_message = text  # Restore original text
        elif width > roi_width:
            columns = len(mutable_message)
            while columns > 0:
                columns -= 1
                mutable_message = '\n'.join(wrap(mutable_message, columns))
                wrapped_width, _ = eval_metrics(mutable_message)
                if wrapped_width <= roi_width:
                    break
            if columns < 1:
                ctx.font_size -= 0.75  # Reduce pointsize
                mutable_message = text  # Restore original text
        else:
            break
    if iteration_attempts < 1:
        raise RuntimeError("Unable to calculate word_wrap for " + text)
    return mutable_message


message = """This is some really long sentence with the
 word "Mississippi" in it."""

ROI_SIDE = 175

with Image(filename='logo:') as img:
    with Drawing() as ctx:
        draw_roi(ctx, ROI_SIDE, ROI_SIDE)
        # Set the font style
        ctx.fill_color = Color('RED')
        ctx.font_family = 'Times New Roman'
        ctx.font_size = 32
        mutable_message = word_wrap(img,
                                    ctx,
                                    message,
                                    ROI_SIDE,
                                    ROI_SIDE)
        ctx.text(75, 275, mutable_message)
        ctx.draw(img)
        img.save(filename='draw-word-wrap.png')