Transformation
Note
The image transform.jpg used in this docs is taken by
Megan Trace, and licensed under CC BY-NC 2.0.
It can be found the original photography from Flickr.
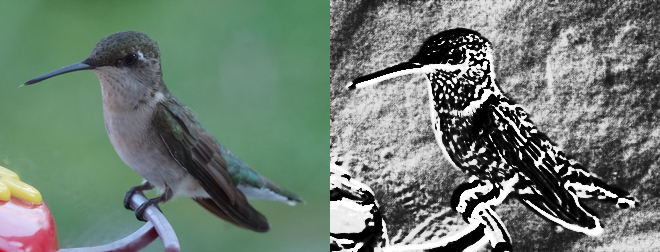
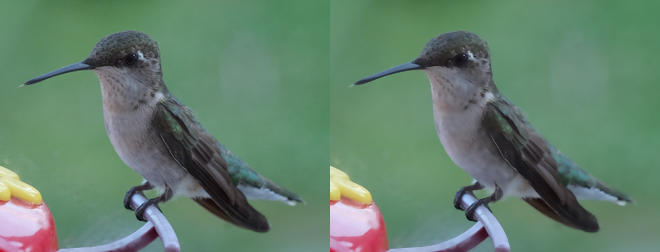
Despeckle
New in version 0.5.0.
Despeckling is one of the many techniques you can use to reduce noise on a given image. Also see Enhance.
from wand.image import Image

with Image(filename="hummingbird.jpg") as left:
    with left.clone() as right:
        right.despeckle()
        left.extent(width=left.width*2)
        left.composite(right, top=0, left=right.width)
    left.save(filename="hummingbird-despeckle.jpg")
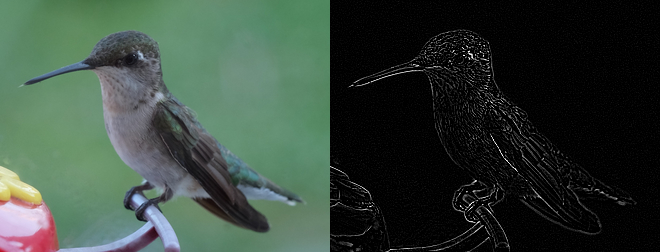
Edge
New in version 0.5.0.
Detects edges on black and white images with a simple convolution filter. If used with a color image, the transformation will be applied to each color-channel.
from wand.image import Image

with Image(filename="hummingbird.jpg") as left:
    with left.clone() as right:
        right.transform_colorspace('gray')
        right.edge(1)
        left.extent(width=left.width*2)
        left.composite(right, top=0, left=right.width)
    left.save(filename="hummingbird-edge.jpg")
Emboss
New in version 0.5.0.
Generates a 3D effect that can be described as print reliefs. Like Edge, best results can be generated with grayscale image. Also see Shade.
from wand.image import Image

with Image(filename="hummingbird.jpg") as left:
    with left.clone() as right:
        right.transform_colorspace('gray')
        right.emboss(radius=3.0, sigma=1.75)
        left.extent(width=left.width*2)
        left.composite(right, top=0, left=right.width)
    left.save(filename="hummingbird-emboss.jpg")
Enhance
New in version 0.5.0.
Reduce the noise of an image by applying an auto-filter. Also see Despeckle.
from wand.image import Image

with Image(filename="hummingbird.jpg") as left:
    with left.clone() as right:
        right.enhance()
        left.extent(width=left.width*2)
        left.composite(right, top=0, left=right.width)
    left.save(filename="hummingbird-enhance.jpg")
Flip and flop
New in version 0.3.0.
You can make a mirror image by reflecting the pixels around the central
x- or y-axis. For example, where the given image transform.jpg:
The following code flips the image using Image.flip() method:
from wand.image import Image

with Image(filename='transform.jpg') as image:
    with image.clone() as flipped:
        flipped.flip()
        flipped.save(filename='transform-flipped.jpg')
The image transform-flipped.jpg generated by the above code looks like:

As like flip(),
flop() does the same thing except it doesn’t
make a vertical mirror image but horizontal:
from wand.image import Image

with Image(filename='transform.jpg') as image:
    with image.clone() as flopped:
        flopped.flop()
        flopped.save(filename='transform-flopped.jpg')
The image transform-flopped.jpg generated by the above code looks like:
Rotation
New in version 0.1.8.
Image object provides a simple method to rotate images:
rotate(). It takes a degree which can be 0
to 359. (Actually you can pass 360, 361, or more but it will be the same to
0, 1, or more respectively.)
For example, where the given image transform.jpg:
The below code makes the image rotated 90° to right:
from wand.image import Image

with Image(filename='transform.jpg') as image:
    with image.clone() as rotated:
        rotated.rotate(90)
        rotated.save(filename='transform-rotated-90.jpg')
The generated image transform-rotated-90.jpg looks like:
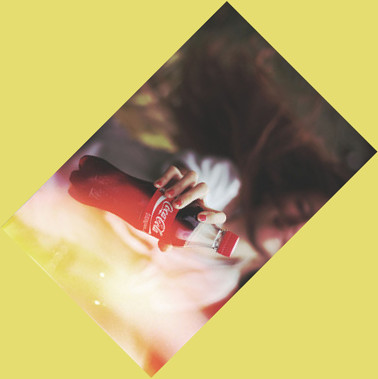
If degree is not multiples of 90, the optional parameter background
will help (its default is transparent):
from wand.color import Color
from wand.image import Image

with Image(filename='transform.jpg') as image:
    with image.clone() as rotated:
        rotated.rotate(135, background=Color('rgb(229,221,112)'))
        rotated.save(filename='transform-rotated-135.jpg')
The generated image transform-rotated-135.jpg looks like:
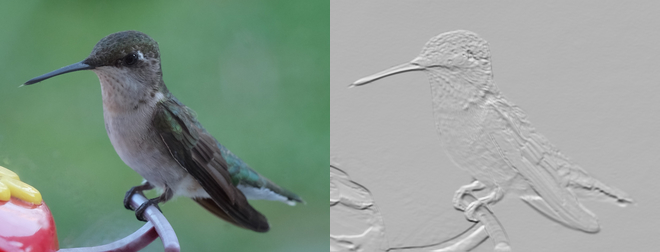
Shade
New in version 0.5.0.
Creates a 3D effect by simulating light from source where aziumth controls
the X/Y angle, and elevation controls the Z angle. You can also determine
of the resulting image should be transformed to grayscale by passing gray
boolean.
from wand.image import Image

with Image(filename="hummingbird.jpg") as left:
    with left.clone() as right:
        right.shade(gray=True,
                    azimuth=286.0,
                    elevation=45.0)
        left.extent(width=left.width*2)
        left.composite(right, top=0, left=right.width)
    left.save(filename="hummingbird-shade.jpg")