Special Effects (FX)
Add Noise
New in version 0.5.3.
You can add random noise to an image. This operation can be useful when applied before a blur operation to defuse an image. The types of noise can be any of the following.
'gaussian'
'impulse'
'laplacian'
'multiplicative_gaussian'
'poisson'
'random'
'uniform'
The amount of noise can be adjusted by passing an attenuate kwarg where the value can be between 0.0 and 1.0.
from wand.image import Image

with Image(filename="inca_tern.jpg") as img:
    img.noise("laplacian", attenuate=1.0)
    img.save(filename="fx-noise.jpg")
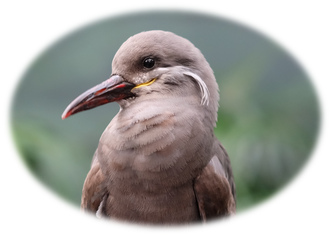
Original |
Noise |

|

|
Blue Shift
New in version 0.5.3.
Gently mutes colors by shifting blue values by a factor. This produces a nighttime scene with a moonlight effect.
from wand.image import Image

with Image(filename="inca_tern.jpg") as img:
    img.blue_shift(factor=1.25)
    img.save(filename="fx-blue-shift.jpg")
Original |
Blue Shift |
|
|

|
Charcoal
New in version 0.5.3.
One of the artistic simulations, charcoal()
can emulate a drawing on paper.
from wand.image import Image

with Image(filename="inca_tern.jpg") as img:
    img.charcoal(radius=1.5, sigma=0.5)
    img.save(filename="fx-charcoal.jpg")
Original |
Charcoal |
|
|

|
Color Matrix
New in version 0.5.3.
This method allows you to recalculate color values by applying a matrix
transform. A matrix can be up to a 6x6 grid where each column maps to
a color channel to reference, and each row represents a color channel
to effect. Usually red, green, blue, n/a, alpha,
and a constant (a.k.a offset) for RGB images, or cyan, yellow,
magenta, black, alpha, and a constant for CMYK images.
For example: To swap Red & Blue channels.
from wand.image import Image

with Image(filename="inca_tern.jpg") as img:
    matrix = [[0, 0, 1],
              [0, 1, 0],
              [1, 0, 0]]
    img.color_matrix(matrix)
    img.save(filename="fx-color-matrix.jpg")
Original |
Color Matrix |
|
|

|
Colorize
New in version 0.5.3.
Blends an image with a constant color. With
Image.colorize(), the color
parameter is the constant color to blend, and the alpha is a mask-color
to control the blend rate per color channel.
from wand.image import Image

with Image(filename="inca_tern.jpg") as img:
    img.colorize(color="yellow", alpha="rgb(10%, 0%, 20%)")
    img.save(filename="fx-colorize.jpg")
Original |
Colorize |
|
|

|
FX
New in version 0.4.1.
FX special effects are a powerful “micro” language to work with.
Simple functions & operators offer a unique way to access & manipulate image
data. The fx() method applies a FX expression,
and generates a new Image instance.
We can create a custom DIY filter that will turn the image black & white, except colors with a hue above 324°, or below 36°.
from wand.image import Image

fx_filter="(hue > 0.9 || hue < 0.1) ? u : lightness"

with Image(filename="inca_tern.jpg") as img:
    with img.fx(fx_filter) as filtered_img:
       filtered_img.save(filename="fx-fx.jpg")
Original |
FX |
|
|

|
Implode
New in version 0.5.2.
This special effect “pulls” pixels into the middle of the image. The amount
argument controls the range of pixels to pull towards the center. With
ImageMagick 7, you can define the pixel interpolate methods. See
PIXEL_INTERPOLATE_METHODS.
from wand.image import Image

with Image(filename="inca_tern.jpg") as img:
    img.implode(amount=0.35)
    img.save(filename="fx-implode.jpg")
Original |
Implode |
|
|

|
Polaroid
New in version 0.5.4.
Wraps am image in a white board, and a slight shadow to create the special effect of a Polaroid print.
from wand.image import Image

with Image(filename="inca_tern.jpg") as img:
    img.polaroid()
    img.save(filename="fx-polaroid.jpg")
Original |
Polaroid |
|
|

|
Sepia Tone
New in version 0.5.7.
We can simulate old-style silver based chemical photography printing by applying sepia toning to images.
from wand.image import Image

with Image(filename="inca_tern.jpg") as img:
    img.sepia_tone(threshold=0.8)
    img.save(filename="fx-sepia-tone.jpg")
Original |
Sepia Tone |
|
|

|
Sketch
New in version 0.5.3.
Simulates an artist sketch drawing. Also see Charcoal.
from wand.image import Image

with Image(filename="inca_tern.jpg") as img:
    img.transform_colorspace("gray")
    img.sketch(0.5, 0.0, 98.0)
    img.save(filename="fx-sketch.jpg")
Original |
Sketch |
|
|

|
Solarize
New in version 0.5.3.
Creates a “burned” effect on the image by replacing pixel values above a defined threshold with a negated value.
from wand.image import Image

with Image(filename="inca_tern.jpg") as img:
    img.solarize(threshold=0.5 * img.quantum_range)
    img.save(filename="fx-solarize.jpg")
Original |
Solarize |
|
|

|
Stereogram
New in version 0.5.4.
Also known as “anaglyph”, this class method takes two
Image instances (one for each eye), and creates a 3d
image by separating the Red & Cyan.
from wand.image import Image

with Image(filename="left_camera.jpg") as left_eye:
    with Image(filename="right_camera.jpg") as right_eye:
        with Image.stereogram(left=left_eye,
                              right=right_eye) as img:
            img.save(filename="fx-stereogram.jpg")
Stereogram |

|
Swirl
New in version 0.5.7.
Creates a visual whirlpool effect by rotating pixels around the center of the
image. The value of degree controls the amount, and distance, of pixels to
rotate around the center. Negative degrees move pixels clockwise, and positive
values move pixels counter-clockwise.
from wand.image import Image

with Image(filename='inca_tern.jpg') as img:
    img.swirl(degree=-90)
    img.save(filename='fx-swirl.jpg')
Original |
Swirl |
|
|

|
Tint
New in version 0.5.3.
Tint colorizes midtones of an image by blending the given color.
The alpha parameter controls how the blend is effected between color
channels. However, this can be tricky to use, so when in doubt, use a
alpha="gray(50)" argument.
from wand.image import Image

with Image(filename="inca_tern.jpg") as img:
    img.tint(color="yellow", alpha="rgb(40%, 60%, 80%)")
    img.save(filename="fx-tint.jpg")
Original |
Tint |
|
|

|
Vignette
New in version 0.5.2.
Creates a soft & blurry ellipse on the image. Use the x & y arguments
to control edge of the ellipse inset from the image border, and radius
& sigma argument to control the blurriness. The radius can be omitted
if you wish ImageMagick to select a value from the defined sigma value.
from wand.image import Image

with Image(filename="inca_tern.jpg") as img:
    img.vignette(sigma=3, x=10, y=10)
    img.save(filename="fx-vignette.jpg")
Original |
Vignette |
|
|
|
Wave
New in version 0.5.2.
Creates a ripple effect within the image. With ImageMagick 7, you can define
the pixel interpolate methods. See
PIXEL_INTERPOLATE_METHODS.
from wand.image import Image

with Image(filename="inca_tern.jpg") as img:
    img.wave(amplitude=img.height / 32,
             wave_length=img.width / 4)
    img.save(filename="fx-wave.jpg")
Original |
Wave |
|
|

|
Wavelet Denoise
New in version 0.5.5.
This method removes noise by applying a wavelet transform. The threshold
argument should be a value between 0.0 &
quantum_range, and the softness argument
should be a value between 0.0 & 1.0.
from wand.image import Image

with Image(filename="inca_tern.jpg") as img:
    img.wavelet_denoise(threshold=0.05 * img.quantum_range,
                        softness=0.0)
    img.save(filename="fx-wavelet-denoise.jpg")
Original |
Wavelet Denoise |
|
|

|