Distortion
ImageMagick provides several ways to distort an image by applying various
transformations against user-supplied arguments. In Wand, the method
Image.distort is used, and follows a
basic function signature of:
with Image(...) as img:
    img.distort(method, arguments)
Where method is a string provided by DISTORTION_METHODS,
and arguments is a list of doubles. Each method parses the arguments
list differently. For example:
# Arc can have a minimum of 1 argument
img.distort('arc', (degree, ))
# Affine 3-point will require 6 arguments
points = (x1, y1, x2, y2,
          x3, y3, x4, y4,
          x5, y5, x6, y6)
img.distort('affine', points)
A more complete & detailed overview on distortion can be found in Distorting Images usage article by Anthony Thyssen.
Controlling Resulting Images
Virtual Pixels
When performing distortion on raster images, the resulting image often includes
pixels that are outside the original bounding raster. These regions are referred to
as vertical pixels, and can be controlled by setting
Image.virtual_pixel to any value
defined in VIRTUAL_PIXEL_METHOD.
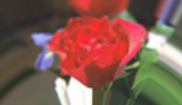
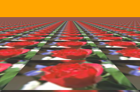
Virtual pixels set to 'transparent', 'black', or 'white' are the
most common, but many users prefer use the existing background color.
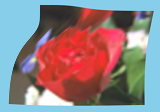
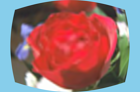
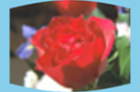
with Image(filename='rose:') as img:
    img.resize(140, 92)
    img.background_color = img[70, 46]
    img.virtual_pixel = 'background'
    img.distort('arc', (60, ))
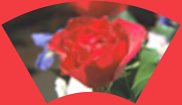
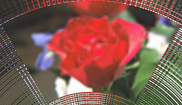
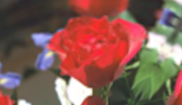
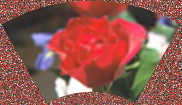
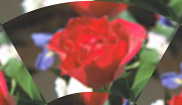
Other virtual_pixel values can create special
effects.
Virtual Pixel |
Example |
|
|
|
|
|
|
|
|
|
|
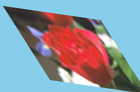
Matte Color
Some distortion transitions can not be calculated in the virtual-pixel space.
Either being invalid, or NaN (not-a-number). You can define how such
a pixel should be represented by setting the
Image.matte_color property.
from wand.color import Color
from wand.image import Image

with Image(filename='rose:') as img:
    img.resize(140, 92)
    img.matte_color = Color('ORANGE')
    img.virtual_pixel = 'tile'
    args = (0, 0, 30, 60, 140, 0, 110, 60,
            0, 92, 2, 90, 140, 92, 138, 90)
    img.distort('perspective', args)
Rendering Size
Setting the 'distort:viewport' artifact allows you to define the size, and
offset of the resulting image:
img.artifacts['distort:viewport'] = '300x200+50+50'
Setting the 'distort:scale' artifact will resizing the final image:
img.artifacts['distort:scale'] = '75%'
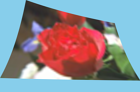
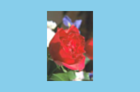
Affine
Affine distortion performs a shear operation. The arguments are similar to perspective, but only need a pair of 3 points, or 12 real numbers.
src1x, src1y, dst1x, dst1y,
src2x, src2y, dst2x, dst2y,
src3x, src3y, dst3x, dst3y,
...
For example:
from wand.color import Color
from wand.image import Image

with Image(filename='rose:') as img:
    img.resize(140, 92)
    img.background_color = Color('skyblue')
    img.virtual_pixel = 'background'
    args = (
        10, 10, 15, 15,  # Point 1: (10, 10) => (15,  15)
        139, 0, 100, 20, # Point 2: (139, 0) => (100, 20)
        0, 92, 50, 80    # Point 3: (0,  92) => (50,  80)
    )
    img.distort('affine', args)
Affine Projection
Affine projection is identical to Scale Rotate Translate, but requires exactly 6 real numbers for the distortion arguments.
Scalex, Rotatex, Rotatey, Scaley, Translatex, Translatey
For example:
from collections import namedtuple
from wand.color import Color
from wand.image import Image

Point = namedtuple('Point', ['x', 'y'])

with Image(filename='rose:') as img:
    img.resize(140, 92)
    img.background_color = Color('skyblue')
    img.virtual_pixel = 'background'
    rotate = Point(0.1, 0)
    scale = Point(0.7, 0.6)
    translate = Point(5, 5)
    args = (
        scale.x, rotate.x, rotate.y,
        scale.y, translate.x, translate.y
    )
    img.distort('affine_projection', args)
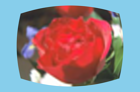
Arc
Arc distortion curves the image around the center point of an image. The arguments are:
ArcAngle, RotateAngle, TopRadius, BottomRadius
Where ArcAngle is the only required arguments, and the rest are optional.
For example:
from wand.color import Color
from wand.image import Image

with Image(filename='rose:') as img:
    img.resize(140, 92)
    img.background_color = Color('skyblue')
    img.virtual_pixel = 'background'
    args = (
        270,  # ArcAngle
        45,   # RotateAngle
    )
    img.distort('arc', args)

Barrel
Barrel distortion attempts to correct spherical distortion caused by camera
lenses. It operates with four constant coefficient values A, B, C, & D
mapped to the images EXIF meta-data. Usually camera, lens, and zoom attributes.
The equation for barrel distortion is:
Where r is the destination radius. The arguments for the distortion are:
A B C D X Y
Where X & Y are optional center coordinates.
For example:
from wand.color import Color
from wand.image import Image

with Image(filename='rose:') as img:
    img.resize(140, 92)
    img.background_color = Color('skyblue')
    img.virtual_pixel = 'background'
    args = (
        0.2,  # A
        0.0,  # B
        0.0,  # C
        1.0,  # D
    )
    img.distort('barrel', args)
Barrel Inverse
The barrel inverse distortion has the same arguments as the barrel distortion, but performs a different equation.
It does not reverse, or undo, the effects of the barrel distortion.
For example:
from wand.color import Color
from wand.image import Image

with Image(filename='rose:') as img:
    img.resize(140, 92)
    img.background_color = Color('skyblue')
    img.virtual_pixel = 'background'
    args = (
        0.0,   # A
        0.0,   # B
        -0.5,  # C
        1.5,   # D
    )
    img.distort('barrel_inverse', args)
Bilinear
The bilinear distortion is similar to perspective distortion, but evenly distributes pixels rather than compress & reduce shrinking areas. This means that shrunk areas of the image will appear flat with bilinear as opposed to farther away. The arguments are:
src1x, src1y, dst1x, dst1y,
src2x, src2y, dst2x, dst2y,
src3x, src3y, dst3x, dst3y,
src4x, src4y, dst4x, dst4y,
...
Unlike other inverse methods, bilinear distortion effects are directional. Meaning you can undo a distortion previously applied. For example:
from itertools import chain
from wand.color import Color
from wand.image import Image

with Image(filename='rose:') as img:
    img.resize(140, 92)
    img.background_color = Color('skyblue')
    img.virtual_pixel = 'background'
    source_points = (
        (0, 0),
        (140, 0),
        (0, 92),
        (140, 92)
    )
    destination_points = (
        (14, 4.6),
        (126.9, 9.2),
        (0, 92),
        (140, 92)
    )
    order = chain.from_iterable(zip(source_points, destination_points))
    arguments = list(chain.from_iterable(order))
    img.distort('bilinear_forward', arguments)
And then reverted with by swapping the destination with source coordinates,
and using 'bilinear_reverse':
order = chain.from_iterable(zip(destination_points, source_points))
arguments = list(chain.from_iterable(order))
img.distort('bilinear_reverse', arguments)
Cylinder & Plane
Cylinder 2 plane is a radial projection to correct common field of vision (fov) distortions. The arguments are:
FovAngle, CenterX, CenterY, FovOutput, DestCenterX, DestCenterY
Where only the first argument is required, and the rest are optional. The FovAngle value can be roughly calculated by:
The 'plane_2_cylinder' is the inverted behavior. The arguments are:
FovAngle, CenterX, CenterY
For (a rather poor) example:
import math
from wand.color import Color
from wand.image import Image

with Image(filename='rose:') as img:
    img.resize(140, 92)
    img.background_color = Color('skyblue')
    img.virtual_pixel = 'background'
    lens = 60
    film = 35
    args = (
        lens/film * 180/math.pi,
    )
    img.distort('plane_2_cylinder', args)
And the inverse:
img.distort('cylinder_2_plane', args)
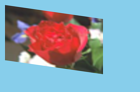
Perspective
Perspective distortion requires 4 pairs of points which is a total of 16 doubles.
The order of the arguments are groups of source & destination coordinate
pairs.
src1x, src1y, dst1x, dst1y,
src2x, src2y, dst2x, dst2y,
src3x, src3y, dst3x, dst3y,
src4x, src4y, dst4x, dst4y,
...
For example:
from itertools import chain
from wand.color import Color
from wand.image import Image

with Image(filename='rose:') as img:
    img.resize(140, 92)
    img.background_color = Color('skyblue')
    img.virtual_pixel = 'background'
    source_points = (
        (0, 0),
        (140, 0),
        (0, 92),
        (140, 92)
    )
    destination_points = (
        (14, 4.6),
        (126.9, 9.2),
        (0, 92),
        (140, 92)
    )
    order = chain.from_iterable(zip(source_points, destination_points))
    arguments = list(chain.from_iterable(order))
    img.distort('perspective', arguments)

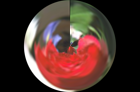
Polar & Depolar
Polar distortion is similar to arc distort method, but does not attempt to preserve aspect ratios.
Radiusmax, Radiusmin, Centerx, Centery, Anglestart, Angleend
All the arguments are optional, and an argument of 0 will use the distance
of the center to the closest edge as the default radius.
For example:
from wand.image import Image

with Image(filename='rose:') as img:
    img.resize(140, 92)
    img.virtual_pixel = 'black'
    img.distort('polar', (0,))
For depolar distortion, the arguments are the same. However to revert the image
previously distorted with nearest edge (argument 0), use -1 for
ImageMagick to calculate the radius distance from the middle to the farthest
edge.
For example:
from wand.image import Image

with Image(filename='distort-polar.png') as img:
    img.virtual_pixel = 'horizontal_tile'
    img.distort('depolar', (-1,))
Polynomial
Polynomial distortion requires at least four sets of coordinates & control
points, and will perform a standard polynomial equation. However, the first
distortion argument is reserved to define the Order, or Complexity
of the two dimensional equation.
Order, src1x, src1y, dst1x, dst1y,
       src2x, src2y, dst2x, dst2y,
       src3x, src3y, dst3x, dst3y,
       src4x, src4y, dst4x, dst4y,
       ...
For example:
from collections import namedtuple
from wand.color import Color
from wand.image import Image

Point = namedtuple('Point', ['x', 'y', 'i', 'j'])

with Image(filename='rose:') as img:
    img.resize(140, 92)
    img.background_color = Color('skyblue')
    img.virtual_pixel = 'background'
    order = 1.5
    alpha = Point(0, 0, 26, 0)
    beta = Point(139, 0, 114, 23)
    gamma = Point(139, 91, 139, 80)
    delta = Point(0, 92, 0, 78)
    args = (
        order,
        alpha.x, alpha.y, alpha.i, alpha.j,
        beta.x, beta.y, beta.i, beta.j,
        gamma.x, gamma.y, gamma.i, gamma.j,
        delta.x, delta.y, delta.i, delta.j,
    )
    img.distort('polynomial', args)
Scale Rotate Translate
A more common form of distortion, the method 'scale_rotate_translate' can
be controlled by the total number of arguments.
The total arguments dictate the following order.
Total Arguments |
Argument Order |
1 |
Angle |
2 |
Scale, Angle |
3 |
X, Y, Angle |
4 |
X, Y, Scale, Angle |
5 |
X, Y, ScaleX, ScaleY, Angle |
6 |
X, Y, Scale, Angle, NewX, NewY |
7 |
X, Y, ScaleX, ScaleY, Angle, NewX, NewY |
For example…
A single argument would be treated as an angle:
from wand.color import Color
from wand.image import Image

with Image(filename='rose:') as img:
    img.resize(140, 92)
    img.background_color = Color('skyblue')
    img.virtual_pixel = 'background'
    angle = 90.0
    img.distort('scale_rotate_translate', (angle,))

Two arguments would be treated as a scale & angle:
with Image(filename='rose:') as img:
    img.resize(140, 92)
    img.background_color = Color('skyblue')
    img.virtual_pixel = 'background'
    angle = 90.0
    scale = 0.5
    img.distort('scale_rotate_translate', (scale, angle,))
And three arguments would describe the origin of rotation:
with Image(filename='rose:') as img:
    img.resize(140, 92)
    img.background_color = Color('skyblue')
    img.virtual_pixel = 'background'
    x = 80
    y = 60
    angle = 90.0
    img.distort('scale_rotate_translate', (x, y, angle,))

… and so forth.
Shepards
Shepard’s distortion moves (or smudges) a given source point to a destination coordinate. The arguments are:
src1x, src1y, dst1x, dst1y,
src2x, src2y, dst2x, dst2y,
...
The size, or inverse weighted distance, of the source point can be controlled
by defining shepards:power artifact.
For example:
from collections import namedtuple
from wand.color import Color
from wand.image import Image

Point = namedtuple('Point', ['x', 'y', 'i', 'j'])

with Image(filename='rose:') as img:
    img.resize(140, 92)
    img.background_color = Color('skyblue')
    img.virtual_pixel = 'background'
    img.artifacts['distort:viewport'] = "160x112-10+10"
    img.artifacts['shepards:power'] = "4.0"
    alpha = Point(0, 0, 30, 15)
    beta = Point(70, 46, 60, 70)
    args = (
        *alpha,
        *beta
    )
    img.distort('shepards', args)